Frequently Asked Questions
General
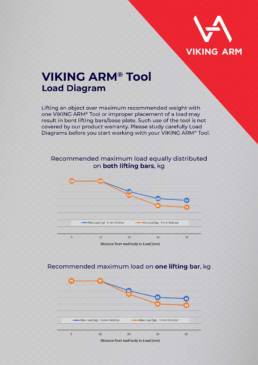
Most people are able to lift up to 150kg/330lb one VIKING ARM® tool. 150kg/330lb is also covered under our warranty.
You may be able to lift/hold/press even heavier objects, but this is not covered under our warranty and is done on your own responsibility. Please take precautions to avoid dangerous situations if you choose to go extreme.
Please also note that the further out on the tip of the baseplate/»fork» you place the load, the higher the forces and strain will be placed on the Viking Arm and the less load/weight can be placed there. Please place the load as far in against the Viking Arm body as possible. See maximum load diagrams.
The feet are impossible to bend under correct use and a nice safety margin is built in here. Bent feet are therefor not a warranty issue.
Please go to the Where to Buy section. The international network of offline and online retailers offering VIKING ARM® tools is continuously growing.
If you are unable to purchase VIKING ARM® through one of our distributors, please don’t hesitate to contact us directly.
We intentionally deliver VIKING ARM® tools without a paper-based manual. You will easily find our manual in the Support section of this WEB page.
Yes, certainly. You can buy baseplates (feet) screws, springs, lock and release mechanism, shaft. These can be ordered separately through your retailer or one of our Service Centers. For Service Centers, please fill out the support form, and the nearest Service Center will contact you.
We are planning to introduce a line of accessories so that you could customize your Viking Arm for various tasks. Please visit Accessories section for updates in our offering.
Currently, in addition to the standard 6 mm baseplate and bars you can purchase thinner baseplate and bars (3 mm). Please see dimensions in Key Specifications. The Accessories can be ordered through your retailer.
Of course. We offer two year product warranty.
You can read more about our product warranty policy in the Support section. Sales of VIKING ARM® tool are regulated by the provisions of the Norwegian Sale of Goods Act (Kjøpsloven) of 01.01.1989 and the Norwegian Consumer Purchases Act (Forbrukerkjøpsloven) of 01.07.2002. VIKING ARM® will always be useful to you, provided you take good care of the tool like protecting against damage and rust and storing it neatly. Please carefully read our maintenance tips in the Support section. Please note that our product warranty doesn’t cover: malfunctioning due to lack of proper recommended maintenance; abuse; incorrect use; impact damage; negligence; accident; alteration; normal wear; damage resulting from overloading the product; failure due to chemical corrosion and physical erosion; unauthorized alteration.
Lifting an object weighing over 150 kg with one VIKING ARM® may result in bent bars/baseplate. Such use of the tool is not covered by our product warranty. Please see the Load Diagram in the Support section. You may remove bars/base and try to bend them back. If this doesn’t help, you can replace the bars/base. The spare parts can be ordered through your retailer.
.
While creaking can be really annoying it doesn’t affect the VIKING ARM®’s functionality. If you want to eliminate creaking, you may try to twist springs a bit first. If this doesn’t help, any fine quality technical lubricant should fix it. Just make sure not to «overlubricate» as that may cause the Viking Arm to slip. One drop of oil of both sides of the short end of the shaft, and moving the Viking Arm body up and down a couple of times to spread the oil, should do it.
See How To video here https://youtube.com/shorts/kSAeNNdhp4g?feature=share
It is important to maintain your VIKING ARM® regularly. This will help to increase the service life as well as the performance and to avoid malfunctioning. Wipe over the Viking Arm with a clean cloth. Drip one or two drop of fine technical oil on both short sides of the shaft at the top of the lock-mechanism, Move the Viking Arm body up and down to spread the oil. Wipe gently off excessive oil. See the How To video for regular maintenance here
https://youtube.com/shorts/kSAeNNdhp4g?feature=share
Your VIKING ARM® shall remain free of debris, sand, cement and dust, which can cause damage over a long time. It is well worth to spend a few minutes cleaning the tool compared to the cost of repairing or replacing it.
Please dry the tool properly if you used it in humid environment. If the arm is dirty, do not hesitate to disassemble it, clean and lubricate properly all the parts. This is also the best first action if you experience loss of proper functionality with you Viking Arm.
See how in this How To video
https://youtu.be/Z_MSdBJ2aXc
Please note that our product warranty doesn’t cover: malfunctioning due to lack of proper recommended maintenance; abuse; incorrect use; impact damage; negligence; accident; alteration; normal wear; damage resulting from overloading the product; failure due to chemical corrosion and physical erosion; unauthorized alteration.
Please regularly inspect your VIKING ARM® for signs of damage and faulty functioning. Ensure that you repair your tool immediately if there is any damage. You can buy spare screws, springs, friction plates, plastic bushings, shaft, “Lock & Release” mechanism, base plate, and bars. These can be ordered from your retailer or by contacting the Service Center serving your country here
https://www.vikingarm.com/support-inquiry/
Maintenance
Give your Viking Arm a long life by taking good care of it.
REGULAR QUICK MAINTENANCE
After having been stored away for a while or been used in dusty environments, a quick wipe-oil-wipe maintenance of the Viking Arm is recommended. Use fine technical oil. NO silicon based oil. We use fine oil for air pressured tools. See the How-To video here!
PROBLEM SOLVING MAINTENANCE
If your Viking Arm ever have a problem lifting, it is time to do a little more thorough maintenance where you also wipe – oil – wipe the three metal friction plates above the spiral spring. THIS VIDEO shows you how, and how to assemble the Viking Arm back in a correct and easy way.
Maintenance manual
Problem solving
When mounting the baseplate/foot, the engraved Viking Arm logo shall be facing up and the short end of the foot facing backwards, under the handles.
Do NOT overtighten the screws. the perfect force is about 6Nm / 4,4 ft lb. If using a battery operated screwdriver, a momentum between 5-7 is usually optimum. Manuel use of a hex key/Allen key is recommended.
You can watch a How-To video HERE.
If your Viking Arm does not manage to LIFT any weight, it is usually a matter of maintenance. Not lifting is usually caused by the three (metal) friction plates above the (lower) spiral spring getting stuck to each other/not able to move independently from each other. It can be caused by microscopic particles, wrong oil, dry out, temperature changes or other reasons.
Even though a little nudge to the friction plates can be enough to continue lifting, it is a clear sign that it is time for maintenance. Wipe-Oil-Wipe.
SEE HOW-TO VIDEO HERE
Step-By-Step
Remove the stop (top) screw.
Hold down the full-release button, and slide the body up and off from the shaft.
Remove the (lower) spiral spring and the 3 metal plates.
Wipe-oil-wipe the 3 friction plates, using fine technical oil (NO organic/silicon based oil). We use oil for air pressured tools.
Wipe off shaft and other parts.
When inserting the 3 friction plates back, the cut-off corner should all be facing the same way, 5’clock when holding the Viking Arm in the handle in front of you.
NOTE that the lever/handle must be resting down when inserting the frictions plates back on top of the spiral spring.
Lower the body over the shaft, but stop when you can see 1/3 of the top hole of the shaft.
Insert the lock unit on top, making sure the plates in front of the lock-unit goes into the opening on top of the body.
Hold down the right full-release button, and press the lock-unit and body down on the shaft.
Add 1-2 drop of oil on both short sides of the shaft, down the opening on top of the lock unit.
Hold down the full release button and slide the body up and down a couple of times. Do also some «pumping» with the lever – all in order to spread the oil.
Gently wipe off excessive oil from the shaft over and under the body.
Remember to put back the top/stop screw.
If you still have problems, contact us through the support form here, and the closest Service Center will help you.
Your Viking Arm is built to hold up to 150kg/330lb + a good safety margin at any time. So if it does not hold this without any problem, you know something is wrong.
NOTE! It is an important difference between not being able to LIFT and not being able to HOLD weight. This section deals with NOT HOLDING WEIGHT.
Not holding weight CAN be caused by excessive use of oil (wipe it off), or use of silicon based oil (wipe it all off with alcohol or other dissolvent before oiling the parts with correct fine technical oil).
But most often, the problem is found in the lock-unit on top of the Viking Arm.
The metal plates in the lock-unit may be out of position/stuck, or the M- or U-spring may have become deformed. Either way, we will help you. Fill out this SUPPORT FORM and we or your nearest Viking Arm Service Center will help you getting your strong team mate back on his feet.
The white plastic piece is a bushing that guides the shaft inside the Viking Arm body. It is a little wear & tear depending on the strain and particles pressing on it.
If it breaks, we will replace it for free for you.
Fill out THIS FORM and we or your nearest Viking Arm Service Center will send you a new one.
THIS VIDEO shows you how to change the bushing.
The (white) bushing guiding the shaft in the body may have broken, leaving too much space for the shaft. The bushing is a little wear & tear depending on the strain and particles pressing on it.
If it breaks, we will replace it for free for you.
Fill out THIS FORM and we or your nearest Viking Arm Service Center will send you a new one.
THIS VIDEO shows you how to change the bushing.
Please fill out this support form, and we or the nearest Viking Arm Support Center will send you a new pin with lock free-of-charge.
On rare occasions, a problem can occur in the mold that weakens the metal. Usually, it is not possible for a human to break the handle, so if it happens by human force alone (not used other tools to press it beyond its limits), we will of course send you a pin-set and new handle free-of-charge.
Please fill out this SUPPORT FORM, and we or your nearest Viking Arm Service Center will be in contact with you.